Office 2010: Modify The Ribbon [How To]
Provided by[sasikumar] Ever since I saw the new ribbon in Office 2007 – I hated it. I looked around and found me a freeware add-in that brought back the old and familiar menu-system. Then came Microsoft Office 2010, and the ribbon had begun to grow on me, don’t get me wrong I still use my old and trusty pre-2007 menu add-In, but not so much any more.
Why, you ask ? First of all, Microsoft has simplified the ribbons, made them more intuitive. Secondly; I can now change them to my liking and need, by adding my custom Tabs, Groups and Commands. In this tutorial I am going to use Microsoft Excel 2010, but the procedure is the same in all Office Programs. Here’s How:
In a earlier post on Microsoft Outlook 2010, I mentioned that they have put all the settings and options in the new File-menu. In Outlook the menu is Orange, In Excel its Green and Word is Blue and so on. But I’m rambling, let’s get started.
1.Click the Filemenu Button
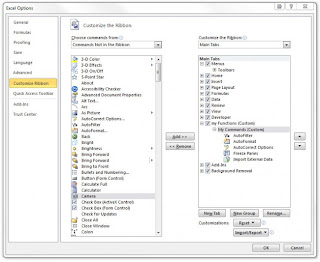
2.Click Options, then Customize Ribbon
Now you’ll see two pull-down menus. The left one has all the commands that are available in your Office Program (in this case Excel). The right pull-down menu shows the Ribbon with its current settings. Each Tab in the Ribbon can expand or close. Each Tab can be hidden or Visible in the Office environment.
Tab and Group, what are they ?
Underneath the Ribbon View there are two buttons; New Tab and New Group. A small explanation is in order:
- Tabs are the headers displayed in the Ribbon, like File, menu, Insert, Page Layout etc.
- While Group is the Dividers within the Tab that you use to show which commands belong together.
Adding a Tab
We are going to make a brand new tab on the Ribbon with some of the functions that are NOT in the Ribbon now. The Tabs can contain Functions, Commands and Custom Macros.
- Click New Tab. A New Tab has been added to the Right Pane, containing a new Group.
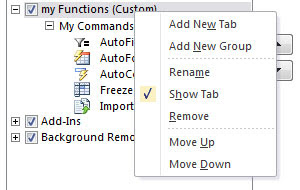
- Right-Click the new tab, and choose Rename. Call it “My Functions

- Right-Click the new Group, choose Rename. Call it “My Commands”. You may also give it an Icon (why I don’t know).
- In the Left Pull-down Menu, Choose Commands NOT in the Ribbon, to display available functions.

I find the following Commands: Button (Form), Combo Box (Form) and Combo List (Edit)
Click each one, then the Add button to add this function to my Custom Group
NOTE!
You can only add Commands in Custom Groups, not into the existing Office Groups. You may add a Custom Group to an existing Tab, but not add Commands to the existing Office Groups.
Removing Tab, Group or Command
To Remove a Tab, Group or Command, Right Click it and choose Remove.
NOTE! You can only remove your Custom added Tabs, Groups and Commands.
Exporting / Importing Custom settings
You may save your customizations for later import or to share with other Office users. Click The Import/Export button and choose your action. Then follow the on-screen instructions.
And there you have it. Remember to Click the OK button when you’re done.


No comments:
Post a Comment